Friday, July 24, 2015

The Table Girl's Birthday

Paper Plates and Crystal has been hijacked! By me, Kathy's sister. And there's a reason for that...

Once a year the family's celebrational table suffers because Kathy is not allowed to create the table setting. The family rule is that whoever has a birthday doesn't have to prep, cook or clean up. Which means that every July there is a table setting to do, and Kathy can't do it. It usually falls to me, her sister, to do the table setting. And I try to do something fun and interesting...and not outside the scope of my abilities.

This year Kathy sort of chose her own. Often she begins with a single inspiration. I decided to let her provide my inspiration. She chose a tea party with finger food rather than a sit down birthday meal, so I asked her to choose a teapot from her collection to be the starting point for the table. Such a rule follower she is. Not. She chose two. One that was a gift from friends and the other that belonged to our grandmother. The final choice was mine.

One teapot had more of the colors to which I am naturally drawn. I chose the other: a plump little apple green teapot with daisies and ladybugs. Our Mom created a wide table runner in the same apple green. The teapot was elevated in the center of the table on a glass cake stand, and a total of nine little bouquets of daisies surrounded the teapot, anchored the runner and sat on the birthday girl's plate in lieu of a place card.

I provided a slight nod to the red ladybugs (I can't stand the color red), plopping a maraschino cherry in the glasses of punch. We didn't really have hot tea because, hello, hundred-degree weather. So the yellow punch with the smallest spot of red worked just fine for me.

The menu (does Kathy usually write about menus?) included sandwiches (some were ham and some were smoked salmon), cheese-pecan wafers, stuffed snow peas, blue cheese and caramelized onion tartlets and petits fours. Pretty tasty. And the table looked fresh as...well...as fresh as a daisy. So that's the story of 2015's "Happy Birthday, Kathy!"  She'll be back for the next post. And I'll see y'all next July!

Thursday, July 9, 2015

LAKehouSe Or Bust

I was recently reminded that one of my favorite weeks of the year is less than a month away. It is the week of my mother's family reunion! And this year there are FOUR generations of our family who will converge on a Mississippi State Park from eight states across the U.S.  Some of us will come and go during the week. Others of us will be there the entire week! I will be one of those.

You are probably wondering what this has to do with my usual posts of table settings and events. While it is a little impractical to try to "set" the tables after the masses descend, the first part of the week is generally dedicated to what my sister, cousin, niece and I refer to as "LAKehouSe". During these few days while everyone else arrives we enjoy a little calm before the joy- and fun-filled storm.


LAKehouSe (representing Lynn, Amy, Kathy and Sarah) is always a carefully thought-out, well-planned, lovely few days. We share a cabin and divide up the activities and the cooking. Some years we have a general theme and then each of us comes up with our own details. Other years we just leave open. As you might suspect I have been known to throw in a table setting or two over the years. Have table settings...will travel!

This year we are celebrating the 10th anniversary of our trip "across the pond" where we traveled to England, France, and Belgium. Since daughter and niece, Sarah, won't be joining us the first part of the week, Lynn, Amy, and I "drew" for which country(s) we would represent in the cooking and activities we plan. I'm all England this year while Lynn and Amy will share France and Belgium. And, yes...there will be a table setting...or two. 

I will post about this year's LAKehouSe after I get back. Until then you can imagine me (spread sheet in hand) planning menus, activities and table settings with an English flair.

Cheerio!  And thanks for stopping by.

(I wonder how much work it would be to replicate Stonehenge in miniature?  Hmmm...)

Sunday, June 14, 2015

Red, White and Blue!

When I see the colors red, white and blue I think of the American flag and our country's patriotic holidays. While we have several that honor and celebrate our country and its armed forces, the one I think of more as a celebration is America's birthday - the 4th of July. Maybe you place a wreath on your front door. Or perhaps you create a patriotic vignette on your porch or patio. Maybe you fire up the backyard BBQ grill, plan a picnic to watch the fireworks or set up a table under the stars. Whatever your reason to decorate, the colors of red, white and blue will generally find their way into your festivities in some way.

I created this table setting a couple of years ago for our 4th of July family get together. It's one of my favorites...mostly because I was able to use two of my favorite dinner plate choices:  my sister's Blue Willow (which she inherited from our grandmother) and my Red-rimmed White. They were perfectly suited for both each other and the occasion. With so many blocks of solid color, the Blue Willow added just enough pattern to make the settings interesting. The woven chargers kept the look informal and the red napkins were placed with the Blue Willow plates for a little contrast.

The centerpiece was a mixture of both fresh and silk flowers and greenery. I enjoy using a combination of fresh and silk. I can't always find the fresh flowers I want in season, but fresh greenery is generally available in abundance.  And it's usually FREE! I used an antique, tarnished coffee pot as my container. The lid was hinged to stay open which made for a unique visual. As you can see from the pictures three small American flags along with red flowers, white flowers and greenery composed the arrangement.  Star-like votive candles completed the centerpiece. I was very pleased with the patriotic atmosphere.

While this was for an indoor meal I would have no problem placing this exact setting in a gazebo or on a patio.  It works for both indoor and outdoor celebrations.


Show your patriotic spirit this 4th of July!  Here's to the Red, White and Blue!
Sunday, June 7, 2015

Father's Day


I was looking at my calendar yesterday and realized that Father's Day is in just a couple of weeks. I will add that to my list of events that need some planning and engage my muse in some "inspirational" conversation.

In the meantime I will share a table setting I created for my father a few years ago. It happens to be one of his favorites...and mine. You see, my father has always been fascinated with ships. Especially the tall ships in full sail. He also loves books! As it happened I was able to use items belonging to him to help the centerpiece come to life. This made the table setting even more special.

The ship models were painstakingly put together by my father many years ago. They have survived four moves - three of which were state to state - and currently reside on the shelves in his office. The books were chosen by title to fit the theme, and dust cover for color. They also pulled double-duty by adding height to the centerpiece.

The scavenger hunt around my parents' house continued into the entry hall where my mother keeps her shell collection. A few carefully selected shells and driftwood brought added texture, color and visual interest. Some antique silver items (pilfered from my sister), colored glass "stones" (from my stash) and tea lights achieved my goal of finding theme-related pieces. I love to use items I find around the house!
Due to the more detailed centerpiece, I chose very simple place settings. Black chargers, white plates, clear water glasses and alternating napkins in ocean tones completed the table top.

It was a Father's Day dinner and the table was all about my father. Mission accomplished!

Tuesday, June 2, 2015

Rehearsal Dinner Deconstructed: Final Thoughts

It is always bittersweet for me when an event takes place and the packing-up begins. I love the planning process and seeing the vision come to life. From the first phone call and email to the event itself, planning this rehearsal dinner with the mother of the groom was so much fun! And that is as it should be. Don't get me wrong; it takes a lot of time and a great deal of work, but it's worth it. While I was very pleased with the end result, knowing that the groom's mother and the groom himself were pleased was the most important thing.


Whatever the event or occasion I like to think "outside the box". And this rehearsal dinner was no exception. Sending an invitation box was inspired! It introduced the event perfectly and we remained open-minded to other unique ideas during the planning process. Upholstery fabric, slate tiles, double old fashion glasses and pebble tiling sheets were used, but not for their intended purposes. They instead became napkins, coasters, vases and place mats. Be original! Use your imagination! It can make the event or occasion more personal and more fun.

While we were on our way home, my sister asked me if I would have done anything differently.  I hadn't had time to think about it then, but now I would probably answer her question with a "no". It was perfect just the way it was! Oh, there might have been some little things like the way the napkins were folded or "hiding" the cut ends of the manzanita branches; but our planning had been so successful that second-guessing the end result wasn't an issue. I love it when a plan comes together!

Many thanks to Lynn, Peggy, and Amy for your individual efforts.  And to Wendy, the groom's mother?  You are awesome to work both for and with!

I would also like to thank [again] Dick, Wendy, Crawford and Shannon for allowing me to post this series. It was a wonderful evening!  Heart.

The happy couple recently celebrated their first anniversary.        

Saturday, May 30, 2015

Rehearsal Dinner Deconstructed: Odds and Ends

The last area to consider in the rehearsal dinner space were the tables set up to hold messages for the bride and groom and take-home favors for each guest. The same decor elements were used for this table as were used for the dining tables. As you will see from the pictures, the manzanita branches were standing vertically instead of horizontally since conversation at this table would not be an issue.

By placing two rectangular tables end to end we accomplished two goals. The first was to break up the spaces between our area and the area already set up for another event the next evening. The second was to represent both a beginning (messages to the couple beginning their married lives together) and an ending (a set of slate coasters for each guest to take home at the end of the evening).  
                       
At one end of the table, rocks and permanent markers were provided for guests to write messages, words of advice, etc., to the bride and groom. This activity also took the place of a traditional guest book. The inscribed rocks were placed in a clear vase for the couple to take home.

The opposite end of the table held sets of four slate coasters for each guest to take home as a remembrance of the evening. The mother of the groom made the coasters with slate tiles, placing self-adhesive felt tabs on the bottom of each tile. The tiles had veins of the peachy-coral and green colors found in our color palette.  Perfect!

Additional touches of our decor elements - Spanish moss, manzanita branches and lanterns - were placed around both the inside and outside dining areas.

Inside, small lanterns were hung in the window-like wall that separated the cafe and large dining area. Manzanita branches, moss and lanterns were placed on each side of the cafe entrance.


Outside, these same small lanterns and some moss were placed on every other stair leading from the rehearsal site up to the porch.

In addition to the stair lanterns, the railings along the stairs and porch were wrapped with fairy lights and then hung with moss to soften the effect.

The evening ended with guests learning some Cajun dance steps and riding the trolley back to the hotel.


I will conclude this series next time when I post some final thoughts.  

Wednesday, May 27, 2015

Rehearsal Dinner Deconstructed: Centerpieces And Table Settings

"Would it all fit?" Yes, it did! AND...with a little room to spare! A few more things were added after this picture was taken, but we made it happen. Several hours later we arrived in Columbus, GA, ready for a good night's sleep. There would be much to do the next day.

When we arrived at the venue the next morning we were met with a familiar sight. The truck driven by the father of the groom was just as full as our vehicle was. We were not looking forward to the chore of unloading said vehicles, but thanks to some forward planning, the parents of the groom DID bring a dolly! (And yes...it was on the spread sheet.)

As with most event set-ups, organization was the key. Once all of the decor elements had been located and organized, we noted the placement and set-up of the tables in all three eating areas. The smaller tables were set for four guests per table. Then I realized that the larger tables were set for eight. Clearly guests would be more comfortable with six per table - which was my plan from the beginning. That would mean adding two more tables.

It was time for some tactful negotiations with the manager for our event. I either made my point or wore the poor man down because I got my six per table and the additional two tables. (Those of you who know me well will not be surprised by this outcome.)

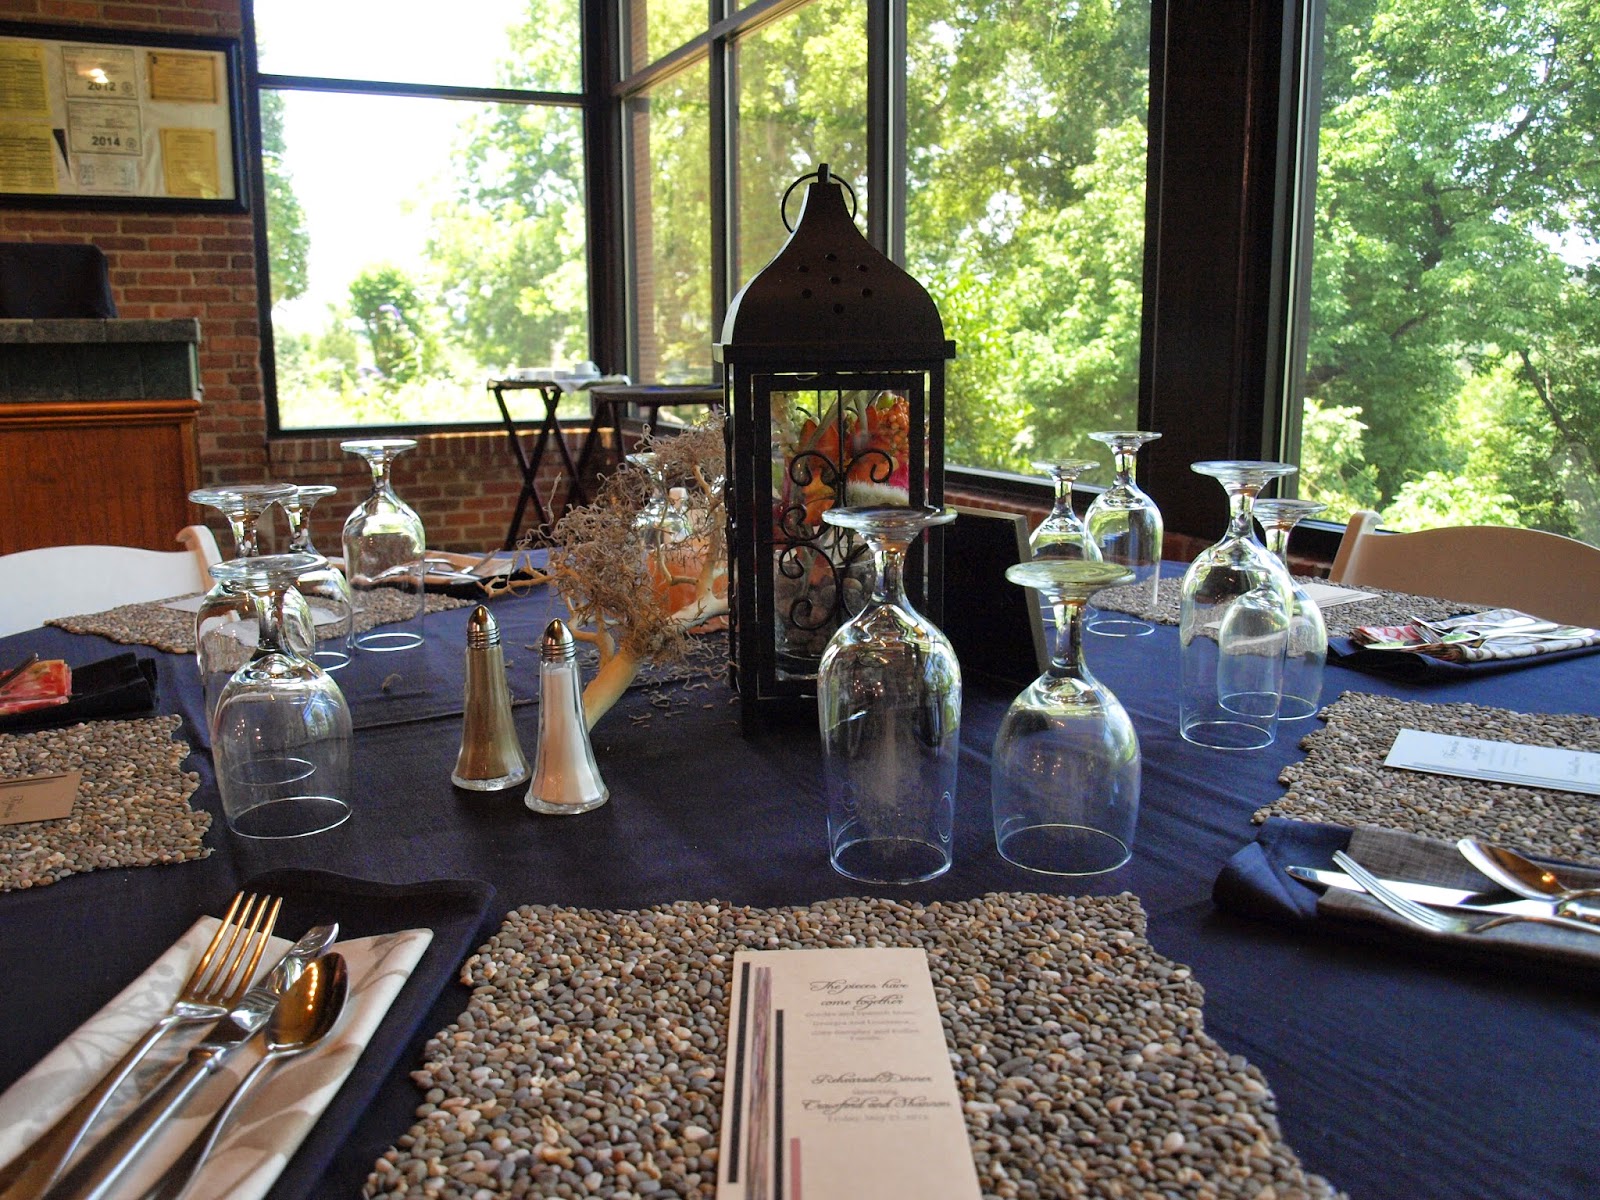
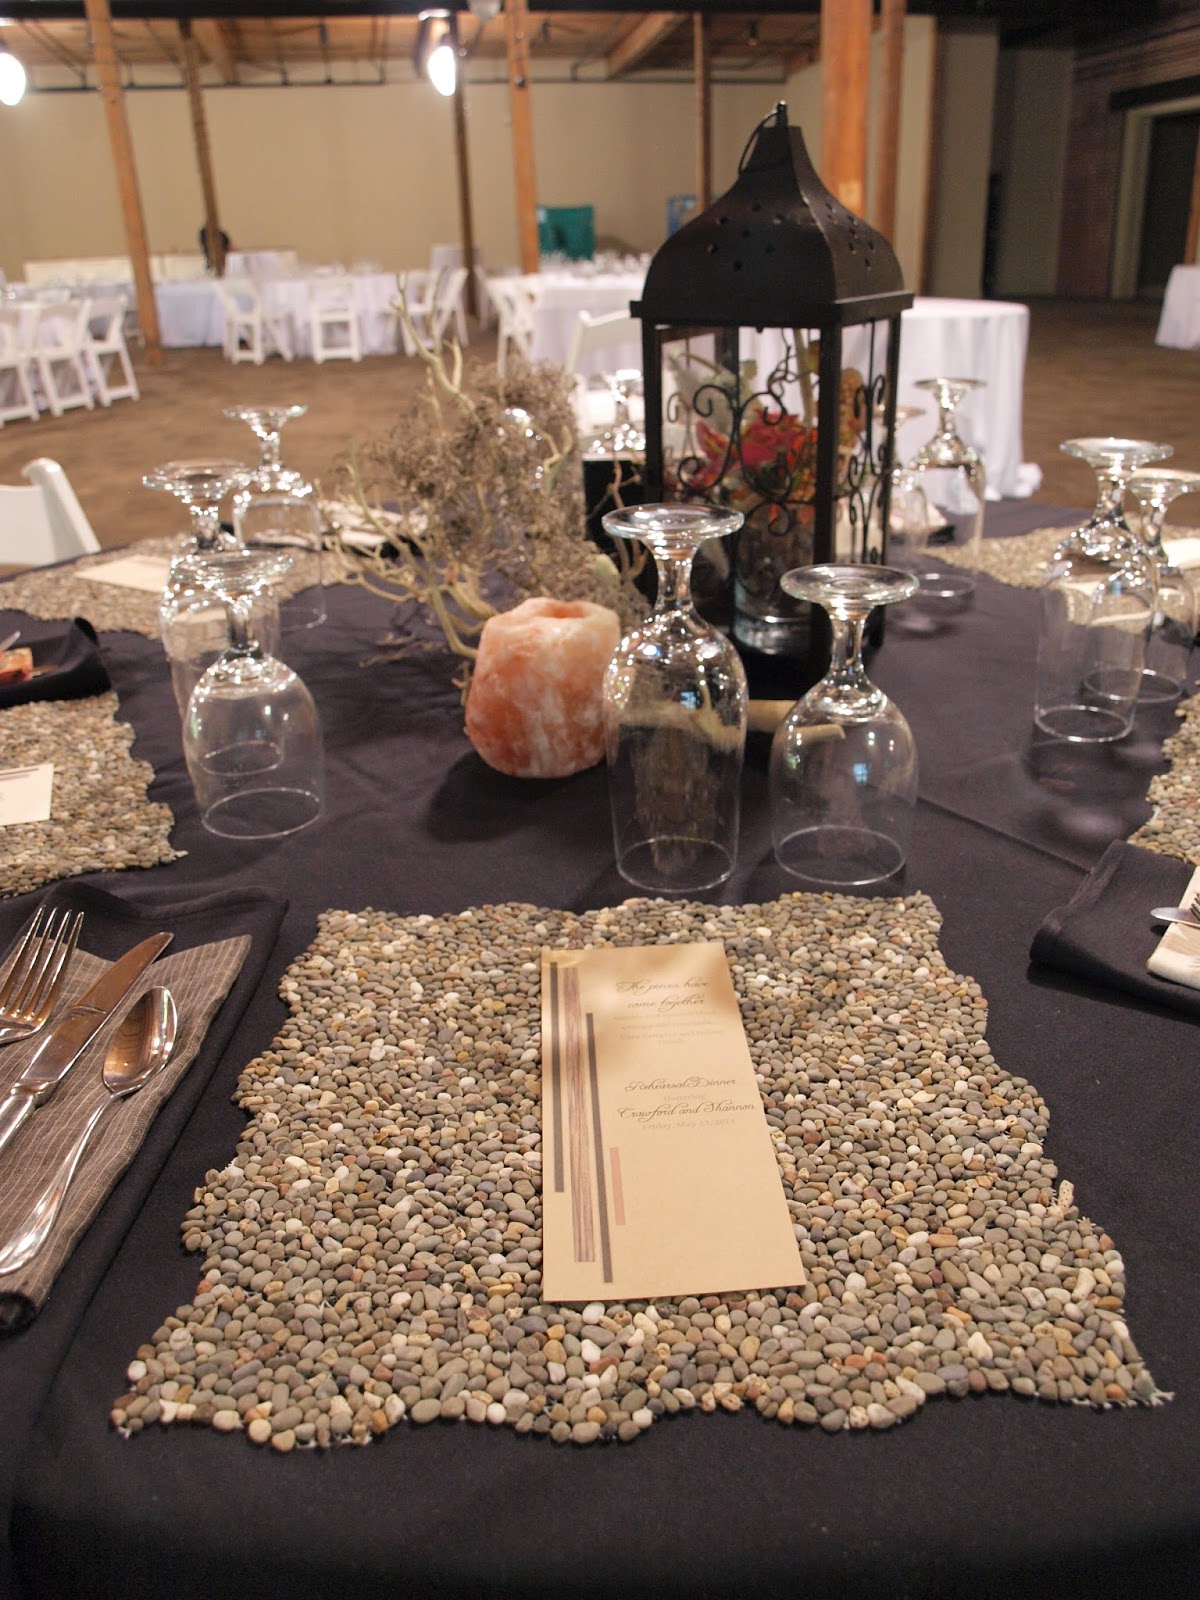
We started with the centerpieces and worked our way out to the place settings. The manzanita branches were draped with Spanish moss. Each black lantern contained a small arrangement of silk flowers in a "hammered" double old fashioned glass filled with pebbles. Battery-operated, flickering, votive candles were placed in each pink salt candle holder. The finishing touch for each centerpiece was a different photo of the bride and groom taken over the course of their relationship.
Each place setting began with the pebbled tiles we used as chargers. They were the perfect contrast to the black cloth toppers we used over white table cloths. And on a photographic note, the tablecloth in the photo below right IS actually black...not blue. The venue's black napkins were folded vertically with one of our custom-made napkins on top. The colors in the napkins echoed the colors in the centerpiece and brought a brightness to each place setting. A custom-designed menu card, on neutral-toned card stock, completed the final look.

My next post in this series will highlight the entry table and finishing touches.  We're almost there!